


1.配置yum源
网络yum源可参考:
https://mirrors.ustc.edu.cn/help/rocky.html
2.安装rear
[root@localhost ~]# yum install rear -y
Installing:
rear x86_64 2.6-19.el9 rocky9-Appstream 721 k
.......... 11/11
Installed:
dhcp-client-12:4.4.2-19.b1.el9.x86_64 ......
Complete!
3.修改配置文件
所有 Rear 配置变量及其默认值都在 /usr/share/rear/conf/default.conf 有可以选值的解释,
[root@localhost ~]# cat /etc/rear/local.conf
OUTPUT=ISO
OUTPUT_URL=null
BACKUP=NETFS
BACKUP_URL=iso:///backup
ISO_DIR="/data/backup"
NETFS_KEEP_OLD_BACKUP_COPY=y
1.备份类型为ISO
2.指定输出位置
3.备份方法:BACKUP=NETFS (内部方法),BACKUP=BORG (外部方法)
- ISO 镜像中包含救援系统和备份
5.iso存放目录
6.在创建新存档时保留旧的备份存档
4.执行备份
[root@localhost ~]# rear -v mkbackup
Relax-and-Recover 2.6 / 2020-06-17
Running rear mkbackup (PID 2581)
Using log file: /var/log/rear/rear-localhost.log
Running workflow mkbackup on the normal/original system
Using backup archive '/var/tmp/rear.ZbDUKuCaEd2CbQO/tmp/isofs/backup/backup.tar.gz'
Using autodetected kernel '/boot/vmlinuz-5.14.0-362.8.1.el9_3.x86_64' as kernel in the recovery system
Creating disk layout
Using guessed bootloader 'GRUB' (found in first bytes on /dev/sda)
Verifying that the entries in /var/lib/rear/layout/disklayout.conf are correct ...
Creating recovery system root filesystem skeleton layout
To log into the recovery system via ssh set up /root/.ssh/authorized_keys or specify SSH_ROOT_PASSWORD
Copying logfile /var/log/rear/rear-localhost.log into initramfs as '/tmp/rear-localhost-partial-2023-12-18T14:47:08+08:00.log'
Copying files and directories
Copying binaries and libraries
Copying all kernel modules in /lib/modules/5.14.0-362.8.1.el9_3.x86_64 (MODULES contains 'all_modules')
Copying all files in /lib*/firmware/
Testing that the recovery system in /var/tmp/rear.ZbDUKuCaEd2CbQO/rootfs contains a usable system
There are binaries or libraries in the ReaR recovery system that need additional libraries
/usr/lib64/systemd/libsystemd-core-252.so requires additional libraries
libsystemd-shared-252.so => not found
ReaR recovery system in '/var/tmp/rear.ZbDUKuCaEd2CbQO/rootfs' needs additional libraries, check /var/log/rear/rear-localhost.log for details
Creating recovery/rescue system initramfs/initrd initrd.cgz with gzip default compression
Created initrd.cgz with gzip default compression (539861093 bytes) in 17 seconds
Making backup (using backup method NETFS)
Creating tar archive '/var/tmp/rear.ZbDUKuCaEd2CbQO/tmp/isofs/backup/backup.tar.gz'
Archived 12387 MiB [avg 27756 KiB/sec] OK
Archived 12387 MiB in 458 seconds [avg 27696 KiB/sec]
Making ISO image
Wrote ISO image: /data/backup/rear-localhost.iso (13G)
Exiting rear mkbackup (PID 2581) and its descendant processes ...
Running exit tasks
5.查看备份iso镜像
[root@localhost data]# cd backup/
[root@localhost backup]# ls
rear-localhost.iso
[root@localhost backup]# ls -lh
total 13G
-rw-------. 1 root root 13G Dec 18 14:56 rear-localhost.iso
6.恢复测试
将iso文件导出到本地
删除启动文件
[root@localhost ~]# rm -rf /boot/grub2/grub.cfg
将iso挂载到设备从iso启动。选择recover localhost
输入账号:root 无密码直接登录
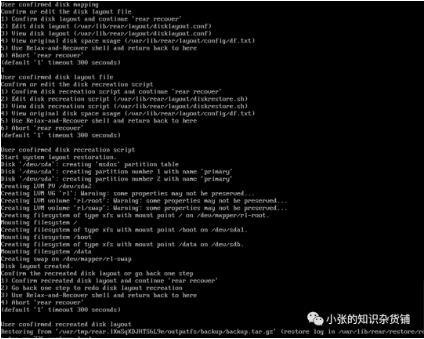
执行rear recover
后面全部回车,等执行完毕卸载镜像重启机器;
恢复完成,可进行系统,与备份之前一致;
选择reciver localhost
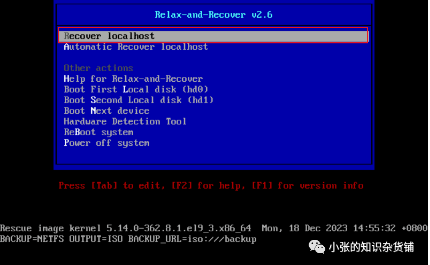
输入账号:root登录,无密码
执行rear recover,后有选项一直回车即可
免责声明:有关资源均收集来自网络与网友提供,任何涉及商业盈利目的的均不能使用,否则后果将由您自己承担,本网站分享的软件资源仅供学习交流使用。所有内容请在下载后24小时内删除,禁止非法恶意传播,不对任何下载或转载造成的危害负任何法律责任,如果本文章存在侵权请点击网站下方联系我,将在最短的时间内对其作出删除处理。